
If you are a proud owner of a vintage Lambretta scooter, you know that restoring it to its former glory can be a challenging yet rewarding project. The Lambretta, with its iconic design and powerful engine, is a symbol of style and freedom. However, over time, the wear and tear can take a toll on its appearance and performance. That’s where restoration comes in.
Restoring a Lambretta involves various aspects, from the engine to the wheels and everything in between. One of the first steps is to assess the condition of the scooter and identify the parts that need attention. This can include replacing worn-out components, such as the engine, wheels, or even the entire frame. It’s important to source genuine Lambretta parts to ensure the authenticity and quality of your restoration.
Once you have the necessary parts, the next step is to carefully disassemble the scooter, taking note of the order and placement of each component. This will make reassembly much easier later on. During the disassembly process, it’s a good idea to take pictures or make notes to document the restoration progress and help you remember how everything fits together.
When it comes to restoring the appearance of your Lambretta, one of the key steps is painting. A fresh coat of paint can make a world of difference in bringing your vintage scooter back to life. It’s essential to choose the right color and finish that matches the original specifications of your Lambretta. Sanding and priming the surface before painting will ensure a smooth and long-lasting finish.
Restoring a vintage Lambretta scooter is a labor of love, and it requires patience, attention to detail, and a deep understanding of the scooter’s mechanics. By following these expert tips and techniques, you can bring your Lambretta back to its former glory and enjoy the thrill of riding a beautifully restored vintage scooter.
Contents
Understanding the History of Lambretta Scooters
The Lambretta scooter has a rich history that dates back to the 1940s. It was first manufactured in Italy by the Innocenti company, and quickly gained popularity as a stylish and efficient mode of transportation. Lambretta scooters were known for their sleek design and smooth ride, and became a symbol of the post-war Italian lifestyle.
Restoring a vintage Lambretta scooter is a labor of love, requiring attention to detail and a deep understanding of the scooter’s history. When starting a restoration project, it’s important to research the specific model and year of your Lambretta scooter to ensure accuracy and authenticity.
One of the key aspects of a Lambretta restoration is the paint. The original paint color and finish can greatly affect the value and aesthetic appeal of the scooter. It’s crucial to use high-quality paint and follow the correct restoration techniques to achieve an authentic look.
Another important aspect of a Lambretta restoration is sourcing the right parts. Due to the age of these scooters, finding original parts can be challenging. However, there are many reputable suppliers and online communities dedicated to Lambretta restoration that can help you locate the necessary parts for your project.
The wheels and chrome accents on a Lambretta scooter are often the first things to catch the eye. Restoring these components requires careful cleaning and polishing to bring back their original shine. It’s important to use the correct techniques and products to avoid damaging the chrome or wheels.
The engine of a Lambretta scooter is the heart of the machine, and restoring it is a complex process. It’s essential to have a thorough understanding of the engine’s mechanics and to use high-quality replacement parts when necessary. Regular maintenance and tuning are also crucial to keep the engine running smoothly.
By understanding the history of Lambretta scooters and following expert tips and techniques, you can successfully restore your vintage scooter to its former glory. Whether you’re a seasoned enthusiast or a beginner, the satisfaction of seeing your restored Lambretta scooter on the road is well worth the effort.
Why Restore a Vintage Lambretta Scooter?
Restoring a vintage Lambretta scooter can be a rewarding and fulfilling project for enthusiasts and collectors alike. Here are a few reasons why you should consider restoring a vintage Lambretta:
Pride of Ownership: Restoring a vintage Lambretta allows you to take pride in owning a piece of history. These scooters have a unique charm and style that is often missing in modern vehicles. By restoring one, you can showcase your love for classic design and craftsmanship.
Preserving History: Vintage Lambretta scooters are a part of automotive history. Restoring one ensures that it will be preserved for future generations to appreciate and enjoy. By bringing an old Lambretta back to its former glory, you are contributing to the preservation of an important cultural artifact.
Learning Experience: Restoring a vintage Lambretta is a great way to learn about the inner workings of these machines. You’ll gain valuable knowledge about the different parts, the engine, the wheels, and the paint. It’s a hands-on experience that allows you to understand the engineering and craftsmanship that went into creating these scooters.
Customization Options: Restoring a vintage Lambretta gives you the opportunity to customize it to your liking. You can choose the color scheme, add accessories, and even modify the engine for better performance. This allows you to create a one-of-a-kind scooter that reflects your personal style and preferences.
Appreciation of Vintage Design: Vintage Lambrettas are known for their timeless design and attention to detail. By restoring one, you can gain a deeper appreciation for the beauty and elegance of vintage scooters. From the chrome accents to the iconic Lambretta logo, every aspect of these scooters is a testament to their vintage appeal.
So, if you have a passion for vintage vehicles and want to own a piece of history, consider restoring a vintage Lambretta scooter. It’s a rewarding project that will allow you to showcase your love for classic design and craftsmanship.
Essential Tools and Equipment for Lambretta Restoration
Restoring a vintage Lambretta scooter requires the use of various tools and equipment to ensure a successful restoration process. Whether you are working on the paint, engine, or other parts of the scooter, having the right tools can make all the difference. Here are some essential tools and equipment you will need for Lambretta restoration:
- Sandpaper and sanding blocks: These are necessary for removing old paint and preparing the surface for repainting. Different grits of sandpaper may be needed for different parts of the scooter.
- Spray gun or paintbrushes: Depending on your preference and the size of the area you are painting, you may choose to use a spray gun or paintbrushes for applying paint. Make sure to use high-quality paint that matches the original color of your Lambretta.
- Engine rebuilding tools: Restoring the engine of your Lambretta scooter may require specialized tools such as piston ring compressors, valve spring compressors, and flywheel pullers. These tools will help you disassemble and reassemble the engine with precision.
- Socket and wrench set: A socket and wrench set is essential for removing and tightening various bolts and nuts during the restoration process. Make sure to have a range of sizes to accommodate different parts of the scooter.
- Chrome polishing kit: If your Lambretta has chrome parts, a chrome polishing kit will help you restore their shine. This kit typically includes polishing compounds, a polishing wheel, and a buffing wheel.
- Electrical testing equipment: To ensure that the electrical system of your Lambretta is in good working condition, you may need electrical testing equipment such as a multimeter. This will help you diagnose and troubleshoot any electrical issues.
- Workbench and vise: Having a sturdy workbench and vise is essential for securely holding and working on various parts of the scooter. This will make it easier to perform tasks such as painting, sanding, and engine assembly.
By having these essential tools and equipment on hand, you will be well-equipped to tackle the restoration of your vintage Lambretta scooter. Remember to always prioritize safety and take your time to ensure a high-quality restoration.
Section 2: Pre-Restoration Preparation
Before diving into the restoration process of your vintage Lambretta scooter, it’s important to properly prepare and assess the condition of your scooter. This will ensure a smooth and successful restoration project. Here are some essential steps to take during the pre-restoration preparation:
| 1. Evaluate the Chrome
Inspect the chrome parts of your Lambretta scooter, such as the handlebars and exhaust. Check for any rust, pitting, or peeling. If the chrome is in poor condition, you may need to consider re-chroming or replacing these parts. |
2. Assess the Wheels
Examine the wheels of your Lambretta scooter for any damage or signs of wear. Look for cracks, dents, or bent rims. If the wheels are in bad shape, you may need to repair or replace them. |
| 3. Inspect the Scooter Body
Closely inspect the body of your Lambretta scooter for any rust, dents, or scratches. Take note of any areas that require attention or repair. This will help you determine the extent of the restoration work needed. |
4. Evaluate the Paint
Check the condition of the scooter’s paint. Look for any chips, fading, or peeling. If the paint is in poor condition, you may need to consider repainting the scooter to restore its original appearance. |
| 5. Assess the Engine
Take a close look at the engine of your Lambretta scooter. Check for any leaks, corrosion, or worn-out parts. It’s important to ensure that the engine is in good working condition before proceeding with the restoration. |
6. Inventory the Parts
Make a detailed inventory of all the parts and components of your Lambretta scooter. This will help you keep track of what needs to be replaced or repaired during the restoration process. |
By thoroughly evaluating and preparing your vintage Lambretta scooter before starting the restoration, you’ll be able to plan and execute the restoration process more effectively. This will result in a beautifully restored scooter that will bring joy and admiration wherever you ride.
Finding and Evaluating a Suitable Lambretta Scooter
If you are interested in restoring a vintage Lambretta scooter, the first step is to find a suitable candidate for restoration. Here are some tips on how to find and evaluate a Lambretta scooter:
Research: Start by doing some research on Lambretta scooters to familiarize yourself with the different models and years. This will help you identify the specific type of Lambretta scooter you are interested in restoring.
Online Classifieds: Check online classifieds websites for Lambretta scooters that are available for sale. Look for detailed descriptions and clear pictures of the scooter. Pay attention to the condition of the engine, frame, and bodywork.
Local Scooter Clubs: Join local Lambretta or vintage scooter clubs and attend their events and meetings. This will give you the opportunity to meet other enthusiasts who may be selling or know of Lambretta scooters for sale.
Word of Mouth: Spread the word that you are looking for a Lambretta scooter. Talk to friends, family, and colleagues who may have connections in the vintage scooter community. They may be able to help you find a suitable scooter for restoration.
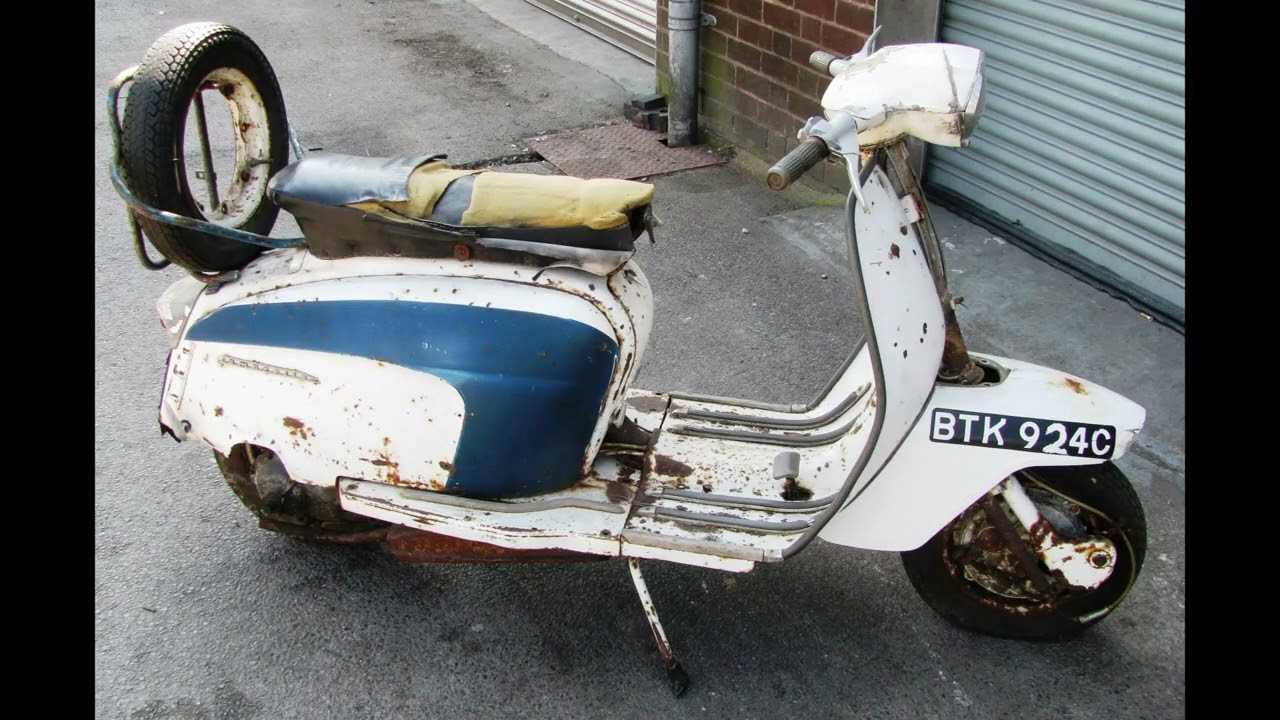
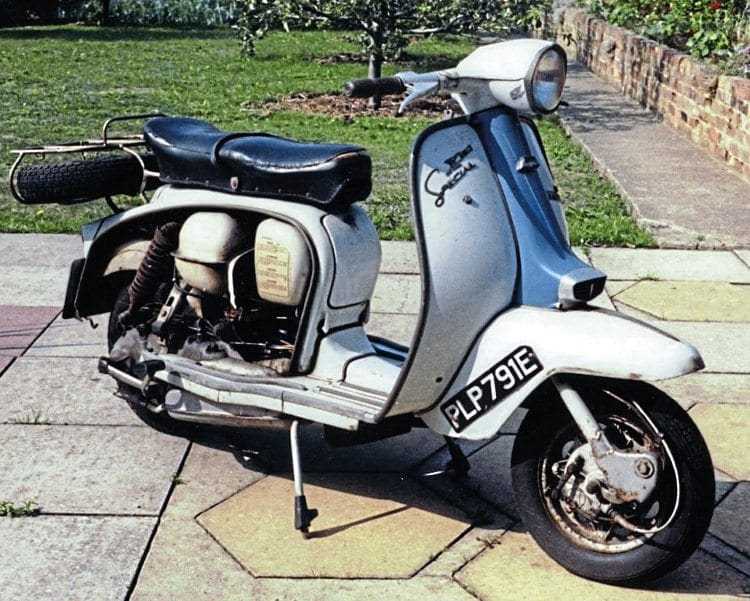
Evaluation: Once you have found a potential Lambretta scooter, it’s important to evaluate its condition before making a purchase. Look for signs of rust, damage, or missing parts. Check the engine for any leaks or unusual noises. Inspect the chrome, paint, and other cosmetic elements for any signs of wear or damage.
Parts Availability: Consider the availability of parts for the specific model of Lambretta scooter you are interested in. Some models may have more readily available parts, while others may require more extensive searching or fabrication.
Price: Finally, consider the price of the Lambretta scooter in relation to its condition and rarity. Take into account the cost of any necessary repairs or restoration work that will be required. It’s important to strike a balance between your budget and the quality of the scooter.
By following these tips, you can find and evaluate a suitable Lambretta scooter for restoration. Remember to take your time and thoroughly inspect any potential candidates before making a purchase.
Creating a Restoration Plan and Setting a Budget
Restoring a vintage Lambretta scooter can be a rewarding and enjoyable project, but it’s important to have a clear plan and budget in place before you begin. This will help you stay organized and ensure that you have the necessary resources to complete the restoration successfully.
The first step in creating a restoration plan is to assess the condition of your Lambretta scooter. Take a close look at the paint, wheels, parts, and engine to determine what needs to be repaired or replaced. Make a list of the necessary tasks and the estimated cost of each item.
| Task | Estimated Cost |
|---|---|
| Repainting the scooter | $500 |
| Replacing the wheels | $200 |
| Repairing the engine | $300 |
| Replacing worn parts | $150 |
Once you have a clear idea of the tasks and costs involved, it’s time to set a budget. Determine how much you are willing and able to spend on the restoration project. Consider your financial situation and prioritize the tasks based on their importance and your budget constraints.
It’s also a good idea to research the availability and cost of replacement parts before setting your budget. Vintage Lambretta parts can be hard to find and expensive, so it’s important to factor this into your plan. Consider reaching out to other Lambretta enthusiasts or joining online forums to get advice and recommendations on where to find affordable parts.
Remember to be realistic with your budget and allow some flexibility for unexpected expenses. Restoring a vintage Lambretta scooter can be a labor of love, but it’s important to have a solid plan and budget in place to ensure a successful restoration.
Disassembly and Documentation of the Scooter
When beginning the restoration process of your vintage Lambretta scooter, it is crucial to properly disassemble the scooter and document each step. This will ensure that you have a clear understanding of the scooter’s condition and will help you keep track of the parts during the restoration process.
Start by removing the wheels from the scooter. Carefully inspect the tires and rims for any damage or wear. Document any issues you find and make a note to replace or repair these parts during the restoration.
Next, focus on the scooter’s paint and bodywork. Take detailed photographs of the scooter from various angles to capture its current condition. This documentation will be helpful when it comes time to repaint or repair the bodywork.
Now, move on to the Lambretta’s engine. Carefully disassemble the engine, documenting each step along the way. Take note of any worn or damaged parts that will need to be replaced during the restoration. Additionally, photograph the engine from different angles to ensure you have a complete record of its condition.
During the disassembly process, be sure to keep track of all the parts you remove. It can be helpful to organize them in labeled containers or use a table to list each part and its corresponding location. This will make reassembly much easier and prevent any confusion or misplaced parts.
If your Lambretta scooter has any chrome parts, such as the handlebars or mirrors, take extra care when disassembling them. Chrome can be fragile and easily damaged, so be gentle and use appropriate tools to avoid any scratches or dents.
By thoroughly documenting the disassembly process of your vintage Lambretta scooter, you will have a clear roadmap for its restoration. This documentation will ensure that no steps are missed and that all the necessary parts and repairs are accounted for. With proper disassembly and documentation, your Lambretta restoration project will be off to a great start.
| Disassembly Steps | Documentation |
|---|---|
| Remove wheels | Inspect tires and rims for damage |
| Focus on paint and bodywork | Take detailed photographs from various angles |
| Disassemble the engine | Document each step and note any worn or damaged parts |
| Organize and label all removed parts | Use containers or a table to keep track of each part |
| Handle chrome parts with care | Use appropriate tools to avoid damage |
Section 3: Restoration Techniques
Restoring a vintage Lambretta scooter requires a combination of technical expertise and attention to detail. In this section, we will explore some key restoration techniques that will help you bring your Lambretta back to its former glory.
| Technique | Description |
|---|---|
| Chrome Restoration | Chrome parts on a Lambretta scooter can become dull and pitted over time. To restore the shine, you can use chrome polish and a soft cloth to gently buff the surface. Be careful not to scratch the chrome while polishing. |
| Engine Overhaul | The engine is the heart of your Lambretta scooter. To restore it, disassemble the engine and clean each part thoroughly. Replace any worn or damaged parts, such as piston rings or gaskets. Reassemble the engine carefully, following the manufacturer’s specifications. |
| Wheel Refurbishment | The wheels of a Lambretta scooter can suffer from rust and corrosion. To restore them, remove the wheels and clean them with a wire brush and rust remover. Sand down any rough spots and repaint the wheels with a high-quality paint. Finish off with a clear coat for added protection. |
| Paint Restoration | The paint on a vintage Lambretta scooter is often faded or chipped. To restore it, start by cleaning the surface and removing any old wax or grease. Sand down any rough areas and apply a primer. Once the primer is dry, apply several thin coats of paint, allowing each coat to dry before applying the next. Finish off with a clear coat for a glossy finish. |
| Parts Replacement | During the restoration process, you may need to replace certain parts that are beyond repair. Look for genuine Lambretta parts or high-quality aftermarket alternatives. It’s important to ensure that the replacement parts are compatible with your specific Lambretta model. |
By following these restoration techniques, you can transform your vintage Lambretta scooter into a stunning piece of automotive history. Remember to take your time, be patient, and enjoy the process of bringing your Lambretta back to life!
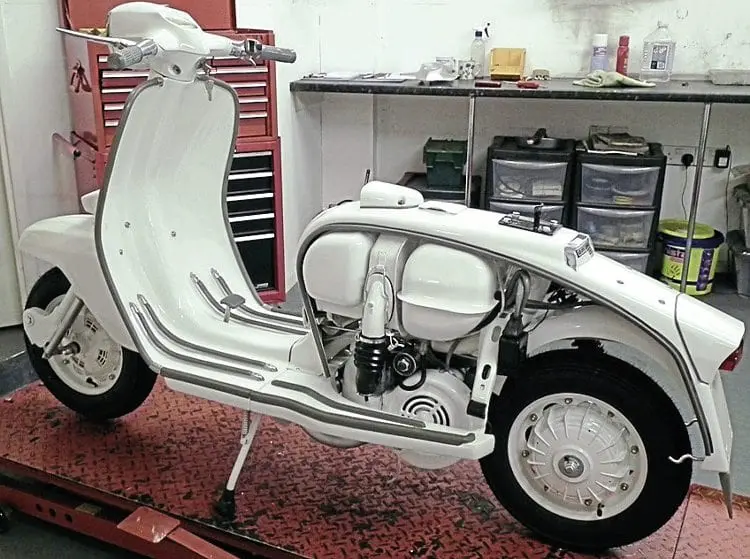
Stripping and Cleaning the Scooter Frame
When it comes to restoring a vintage Lambretta scooter, one of the most important steps is stripping and cleaning the scooter frame. This is where you’ll remove the old paint, rust, and dirt to prepare the frame for restoration.
First, you’ll need to remove all the parts from the frame, including the engine, wheels, and other components. This will allow you to have full access to the frame and ensure a thorough cleaning. Make sure to label and organize all the parts so you can easily put them back together later.
Next, you’ll want to strip the old paint from the frame. There are several methods you can use, including sanding, chemical paint stripper, or media blasting. Choose the method that works best for you and carefully remove all the old paint from the frame. This will give you a clean surface to work with and allow the new paint to adhere properly.
After stripping the paint, it’s time to clean the frame. Use a degreaser or cleaning solution to remove any grease, oil, or dirt that may have accumulated over the years. Scrub the frame thoroughly with a brush or sponge, paying special attention to hard-to-reach areas. Rinse the frame with water to remove any residue from the cleaning solution.
Once the frame is clean and dry, inspect it for any rust or damage. If you find any rust, use a rust converter or sand it off to prevent further corrosion. Repair any damage or cracks in the frame before moving on to the next step.
With the frame stripped and cleaned, you’re now ready to begin the restoration process. This includes priming and painting the frame, as well as reassembling all the parts. Take your time and follow proper techniques to ensure a high-quality restoration that will last for years to come.
Remember, the frame is the foundation of your Lambretta scooter, so it’s essential to strip and clean it properly before starting the restoration. By taking the time to do this step correctly, you’ll set yourself up for success and end up with a vintage scooter that looks and performs like new.
Repairing or Replacing Body Panels and Parts
When restoring a Lambretta scooter, one of the most important aspects is repairing or replacing body panels and parts. Over time, the body panels of a vintage Lambretta can become damaged or rusted, and it’s essential to restore them to their original condition.
First, assess the condition of the body panels. Look for any dents, scratches, or rust spots. If the damage is minor, you may be able to repair it yourself. Use a body filler to fill in any dents or scratches, and then sand the area smooth. Once the body filler is dry, you can prime and paint the panel to match the original color.
If the damage is more severe or if the body panel is beyond repair, you will need to replace it. Fortunately, there are many suppliers that offer reproduction body panels for Lambretta scooters. These panels are made to the original specifications and can be easily fitted onto your scooter. When purchasing replacement panels, make sure to choose ones that are made from high-quality materials to ensure durability.
In addition to body panels, you may also need to repair or replace other parts of the scooter. The engine is one of the most critical components, and it’s essential to ensure that it’s in good working order. If the engine is not running smoothly, you may need to rebuild or replace it. Similarly, the paint, chrome, and wheels may also need attention during the restoration process.
Restoring a Lambretta scooter is a labor of love, and taking the time to repair or replace body panels and parts will ensure that your scooter looks and functions as close to its original condition as possible. Whether you choose to repair or replace, make sure to use high-quality materials and follow the proper techniques to achieve the best results.
By paying attention to the details and investing in the necessary repairs or replacements, you can bring your vintage Lambretta scooter back to life and enjoy the thrill of riding a classic piece of history.
Engine Rebuilding and Performance Upgrades
When it comes to restoring a vintage Lambretta scooter, one of the most important aspects is the engine. The engine is the heart of the scooter, and without a properly functioning engine, all the paint and chrome in the world won’t make a difference.
If you’re restoring a Lambretta scooter, it’s likely that the engine will need some attention. Over the years, the engine may have accumulated dirt and grime, and the internal components may have worn out. Rebuilding the engine is a crucial step in the restoration process.
When rebuilding the engine, it’s important to start with a thorough cleaning. Remove all the dirt and grime from the engine components and inspect them for any signs of damage. Replace any worn-out or damaged parts to ensure optimal performance.
Once the engine is clean and all the necessary repairs have been made, it’s time to consider performance upgrades. There are several ways to improve the performance of a vintage Lambretta scooter’s engine.
One option is to upgrade the carburetor. A larger carburetor can provide more fuel and air to the engine, resulting in increased power and performance. Additionally, upgrading to a high-performance exhaust system can help improve the engine’s efficiency and increase horsepower.
Another option is to upgrade the ignition system. Installing a high-performance ignition coil and spark plug can improve the scooter’s starting and running performance.
Finally, consider upgrading the wheels and tires. Upgrading to larger wheels and high-performance tires can improve the scooter’s handling and overall performance.
When it comes to engine rebuilding and performance upgrades, it’s important to consult with a Lambretta restoration expert. They will have the knowledge and experience to guide you through the process and ensure that your vintage scooter is restored to its full potential.
Section 4: Painting and Finishing
When it comes to restoring a vintage Lambretta scooter, one of the most important steps is painting and finishing. This is where you can really make your scooter shine and stand out from the rest.
First, you’ll want to start by prepping the engine and wheels for painting. Make sure to clean them thoroughly and remove any rust or debris. Then, apply a primer to ensure that the paint adheres properly. Once the primer is dry, you can start applying the paint color of your choice. Be sure to apply multiple thin coats for a smooth and even finish.
When it comes to the rest of the scooter, you’ll want to carefully restore any chrome parts. Chrome can be prone to rust and pitting, so it’s important to clean and polish it properly. There are many chrome restoration products available on the market that can help you achieve a shiny and polished look.
After you’ve painted and restored the chrome parts, it’s time to finish off the restoration by adding any decals or emblems that were originally on the scooter. These small details can really make a difference and give your Lambretta that authentic vintage look.
Finally, don’t forget to protect your hard work by applying a clear coat. This will not only add a glossy finish, but also help to protect the paint from chips and scratches.
By following these painting and finishing tips, you can ensure that your vintage Lambretta scooter looks as good as new. Whether you’re restoring it for yourself or for someone else, the end result will be a beautiful and eye-catching scooter that is sure to turn heads.
Surface Preparation and Priming
When restoring a vintage Lambretta scooter, one of the most important steps is surface preparation and priming. This process ensures that the parts of the scooter are properly prepared for painting and that the paint will adhere correctly.
First, it is essential to thoroughly clean all parts of the scooter. This includes removing any dirt, grease, and rust. Use a mild detergent and water to clean the parts, and a wire brush or sandpaper to remove any rust or flaking paint. Once the parts are clean, allow them to dry completely before moving on to the next step.
Next, it is time to prime the parts. Priming helps to seal the surface and provides a smooth base for the paint to adhere to. Use a high-quality automotive primer that is compatible with the type of paint you will be using. Apply the primer in thin, even coats, allowing each coat to dry before applying the next. This will help to prevent drips and ensure a smooth finish.
Before applying the primer, it is important to mask off any areas that you do not want to be painted. This includes areas such as chrome or wheels that you want to keep in their original condition. Use masking tape and newspaper to cover these areas and protect them from the primer and paint.
Once the primer is dry, you can move on to the painting process. Choose a high-quality automotive paint that is specifically designed for scooters or motorcycles. Apply the paint in thin, even coats, following the manufacturer’s instructions. Allow each coat to dry before applying the next, and apply as many coats as necessary to achieve the desired coverage.
After the paint has dried completely, you can remove the masking tape and newspaper. Take the time to inspect the paint job and make any necessary touch-ups or corrections. Once you are satisfied with the paint job, you can apply a clear coat to protect the paint and give it a glossy finish.
By properly preparing the surfaces and priming before painting, you can ensure a professional-looking restoration of your vintage Lambretta scooter. Take your time with this step, as it will greatly impact the overall appearance and durability of the finished product.

Since childhood, I’ve been fascinated with vintage scooters and motorcycles. After university, I founded a workshop that restored classics like Vespas, Lambrettas, and MZs. With my girlfriend, Akiko Tanaka, I run the workshop’s website and showcase our custom restorations at iconic rallies across Europe and North America. Our Lambretta won first place at the 2019 Euro Lambretta meet in Germany. Through our website and global events, we share our passion for restoring and riding these retro rides.